Difference between revisions of "Setting up TeamViewer for support session with OdataLink"
Jump to navigation
Jump to search
m |
|||
| Line 1: | Line 1: | ||
__NOTOC__ | __NOTOC__ | ||
'''TeamViewer''' | We provide support via [https://www.teamviewer.com '''TeamViewer''']. | ||
In preparation for you support session, please follow the steps below to set up '''TeamViewer'''. | |||
<div style="display: grid; float: right;"> | <div style="display: grid; float: right;"> | ||
Revision as of 18:35, 15 October 2024
We provide support via TeamViewer.
In preparation for you support session, please follow the steps below to set up TeamViewer.
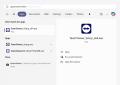
Apps:TeamViewer
TeamViewer Old Layout
TeamViewer New Layout


Check if Teamviewer is already installed
- Click on Start and start typing Apps: Teamviewer.
- If you have Teamviewer installed, Open the app and skip to Step 1 in the next section #Open the Teamviewer app.
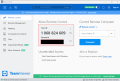
- If you can't see TeamViewer app, to install from the Microsoft Store follow this link
- This link takes you directly to Teamviewer Remote app on Microsoft Store. Click Install.
- A Microsoft store pop-up box will appear. Click Install.
- When the installation is completed, Open TeamViewer app.
- If the Microsoft Store installation fails, please install TeamViewer manually
Open the Teamviewer app
- Open your TeamViewer app.
- If you are opening TeamViewer for the first time, you will be presented with a License Agreement and EULA Dialog Box. Accept the License Agreement and click on Continue.
- Please ensure that you are on the latest version of TeamViewer
- Your unique Connection ID and Password will be displayed as per your layout. Please share these credentials with your support person.
- The support person will enter the ID and Password provided in the last step.
- Your TeamViewer session with OdataLink will start.
Download Temporary Session Handler
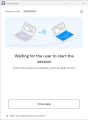
Wait for session start
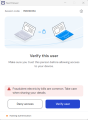
Verify User
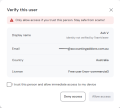
Verify User - Allow Access
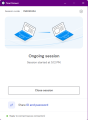
Connection established


Installation restricted by IT policy
If installing apps is disabled by your organisation IT policy, Please let us know in advance.
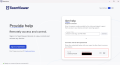
Support person will generate and share a QuickSupport session URL.
Please follow the steps below to install an alternative Quick Support Session Handler application:
- A Quick Support link of the format https://quicksupport.me/s156010354 would be provided by us. Browse to the link.
- Click on For Windows or For MacOS as per your system configuration.
- A file download dialog will be opened. Once the download is completed, install the Temporary Session Handler.
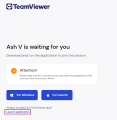
- Wait for a few minutes until your support person starts the TeamViewer session.
- Once the session is started, you will be asked to verify the person providing you support. Click on Verify user.
- Support person's details would be displayed on the screen. Verify the details and tick the "I trust this person..." checkbox.
- Click on Allow Access.
- Your TeamViewer session with OdataLink will start.
Related Topics
- Getting Ready for your Support session with OdataLink
- Setting up Microsoft Teams for support session with OdataLink